 Code - Figure 1
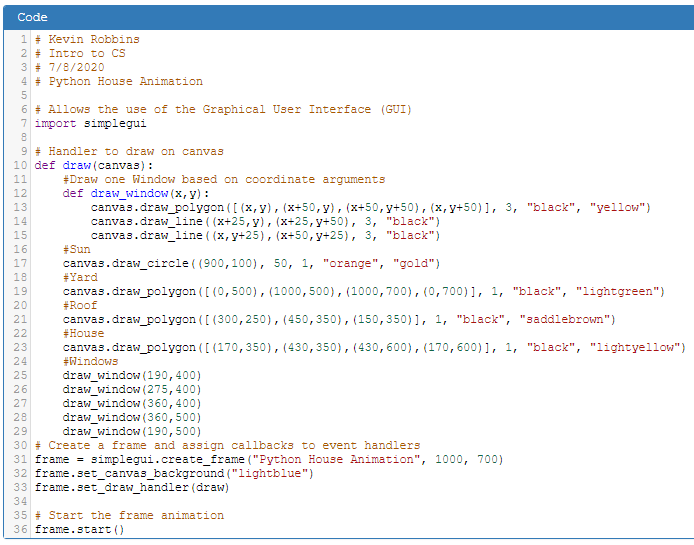
At the end of the last lesson I showed you the house animation output, without showing the code. The purpose was for you to add
the homework assignments on your own, using the knowledge of code you are learning, the shape functions we have covered, and I hope, some
functions you have created on your own.
Our code is complicated enough now, that no two people in the class will have the same code. Still, your code should be somewhat similar to Code - Figure 1.
With our latest addition being a function that produces a window and positions it at coordinates specified by its parameters. Or in plain-speak, we plug in a
corner point and the function draws the rest of the window.
In this short lesson we are going to run with that idea, by adding two more functions with a couple of little nuances. And again we will be defining
functions. But first we will go over your assigned work. So open CodeSkulptor with what you have done. I'll open my work, which is Code - Figure 1
and we'll go over the code.
Quick Check - Answer the question, then click the question text to see the correct answer.
True or False? Functions help the programmer write less code.
True. Functions allow you to use the same code over and over.
The parameters of a function can be changed because they are _________.
variables
A function definition line always ends with a __________.
colon
Door - Assignment 1
I was pretty specific about what I wanted for this assignment. The screen shot of the door included a direction that you should make look like the screen shot.
I left you to write the code to produce that door.
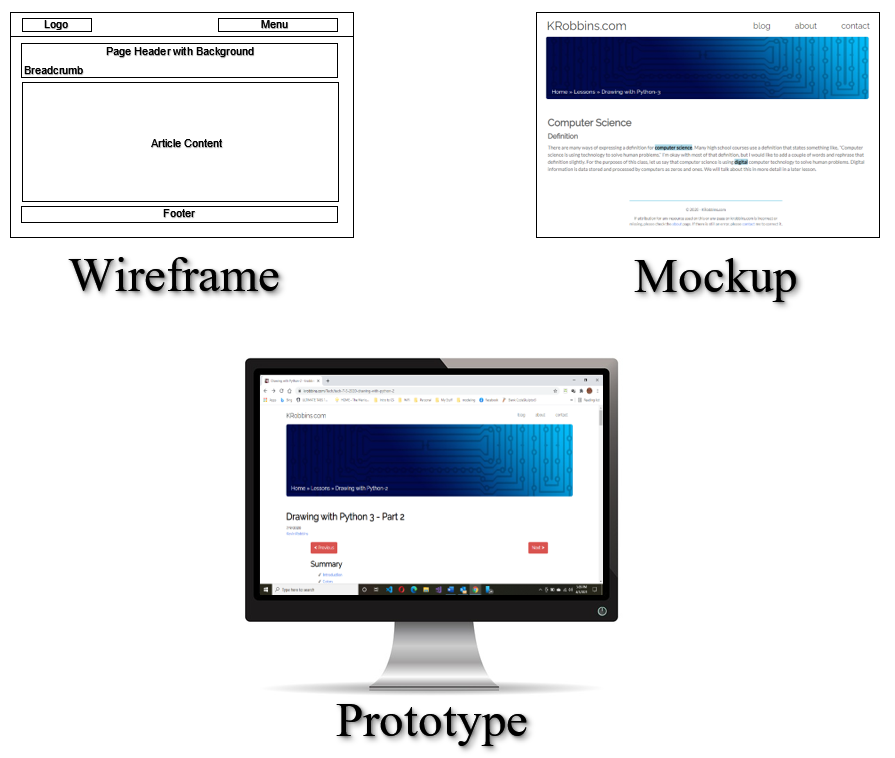
As a programmer you will most often work as a part of a team. Depending on what tasks your team is responsible for, you may find that you need to
comply with visual instructions that involve what is now called UX Design (User Experience Design). This usually involves three visual tools that help
programmers design a user interface. Even though they are most commonly thought of as web developers tools, they are used in many areas of programming.
This is especially true now that the digital world moves further and further away from locally installed applications and into the cloud.
The website you are currently viewing this page on is actually an ASP.net web application.
They are:
 UX Design process for this website.
- Wireframe
According to www.usability.gov
A wireframe is a two-dimensional illustration of a page's interface that specifically focuses on space allocation and prioritization of content,
functionalities available, and intended behaviors. For these reasons, wireframes typically do not include any styling, color, or graphics.
In this lesson, although not a great example, the graph we have been using is similar to a wireframe, in that we have used it to layout items
in our program, without concern for color or style.
- Mockup
A mockup is an image type simulation of the finished product that incorporates the visual look of the product design including color and style elements.
Often mockups are created with specialized software or are images produced in graphics software such as Adobe Illustrator or Photoshop. We have been using
the image from a previous class, although not strictly, as a kind of mockup that we have designed many of our house elements from.
We are using the Door Assignment image at the end of the previous lesson, in a similar fashion. It includes the color and style that I have ask you to
reproduce, so it is in some small sense a mockup.
- Prototype
A prototype is designed to specifically display a user experience with the interface.
#Front Door Transom
canvas.draw_circle((300,500), 25, 3, "black", "yellow")
canvas.draw_polyline([(288,479),(300,500),(312,479)], 3, "black")
#Front Door
canvas.draw_polygon([(275,500),(325,500),(325,600),(275,600)], 3, "black", "crimson")
canvas.draw_circle((320,550), 4, 1, "black", "gold")
Everything I am doing here is based on my graph and an actual door I have drawn with at least the starting coordinates.
Starting at the top of the code, I always comment what I am doing. We start with a circle for the transom. Why should
the transom be first if I am using a circle? Correct! We are covering the bottom of the circle with the door. In
programming of many languages, hiding objects with other objects in front of them is a common practice.
The V shape inside the transom to represent window panes, is done with the draw_polyline() function, which
can have many segments and you can even enclose it by making the last coordinate the same as the first. But, being a
type of line, it does not have one important property. What would that be? Yes, there is not fill property. Therefore
you can only change the number of segments, the line thickness and line color.
The door should have been no problem for you, being a rectangle and the doorknob is very small circle.
Quick Check - Answer the question, then click the question text to see the correct answer.
The UX in UX Design, stands for _____ _______.
User Experience
A static image that includes style and color, but not functionality, of a website or application is called a ____________.
mockup
True or False? You cannot fill a polyline with a color.
True. A polyline function does not have a fill property.
Room Addition - Assignment 2
For the room addition assignment I left it totally up to your imagination. Actually, most of this whole project is using your imagination to code this
drawing. I went minimalist myself and only added a small rectangle, triangle for the roof. I used the window function we created previously for a single window.
This used only code you are familiar with unless you got fancy, which I hope you did.
I also hope you are remembering to use the CodeSkulptor Save button, to save versions of your work at every major change.
This is not only a good practice in school to help you keep track of your code and the steps in writing your program, but it is also similar to a methodology
used in the IT sector called version control. CodeSkulptor's Save feature (albeit on a much smaller scale) is a little like version control in that
every time you save, a number is added to your URL, allowing you to go back if necessary to previous versions of your program. This gives us the opportunity
to take a look at version control and VCS (Version Control Systems). Watch Version Control System Introduction from Georgia Tech.
Here is my very simple solution for Room Addition - Assignment 2 is shown below. I hope you were more artistic than I was. This code would be a minimum acceptable
solution.
#House addition
canvas.draw_polygon([(430,450),(540,480),(430,480)],1,"black","saddlebrown")
canvas.draw_polygon([(430,480),(520,480),(520,600),(430,600)],1,"black","lightyellow")
draw_window(450,500)
Quick Check - Answer the question, then click the question text to see the correct answer.
A system that allows you to manage multiple revisions of the same unit of information is called a ________ ________ ________.
Version Control System or VCS
True or False? Multiple programmers can work on source code at the same time within a VCS.
True.
CodeSkulptor saves your code by adding a number to your __________ allowing you to see previous versions.
URL
draw_cloud() Function - Assignment 3
My Solution:
My idea is to define a function that draws a group of circles that look like a cloud and call that function
with different starting coordinates to give the appearance of differently shaped clouds.
Defining the function-
#Draw one white circle based on coordinate arguments.
def draw_cloud(x,y):
    canvas.draw_circle((x,y), 20, 1, "white", "white")
    canvas.draw_circle((x+10,y+10), 15, 1, "white", "white")
    canvas.draw_circle((x+30,y+5), 20, 1, "white", "white")
    canvas.draw_circle((x+40,y+20), 15, 1, "white", "white")
    canvas.draw_circle((x+65,y+10), 20, 1, "white", "white")
    canvas.draw_circle((x+85,y+15), 15, 1, "white", "white")
Calling the function-
#Clouds
draw_cloud(100,100)
draw_cloud(150,120)
draw_cloud(700,200)
draw_cloud(750,175)
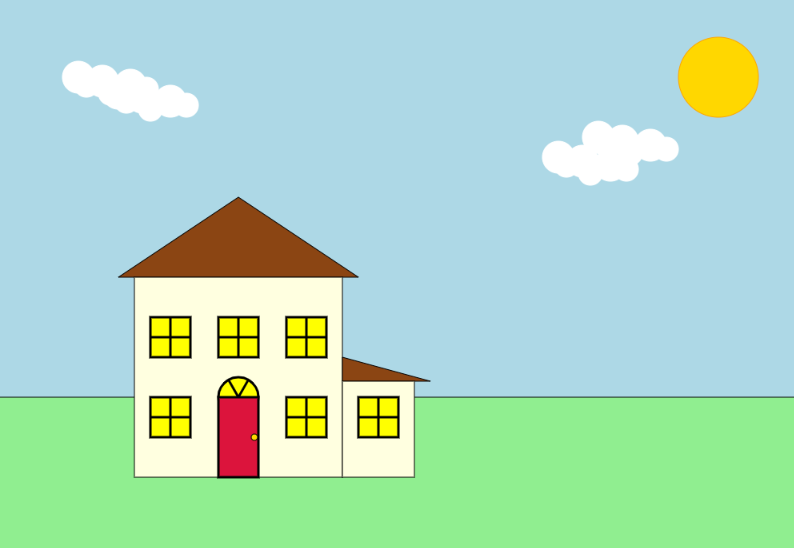 House with assignments- Figure 2
Even though your assignment 3 code may not look like mine, that is not the purpose. The purpose is to draw some clouds by using variables as
coordinates. The function definition draws 6 circles. By using it we are able to draw a total of 24 circles with a lot less code. When we call
the function we are plugging the coordinates (arguments) into the variables (parameters) of the function. Since these parameters are variables
we don't need to know what they are specifically. We can specify any other item in relationship to them by simply adding or subtracting from x and y.
We started using functions by defining a function that draws a single a window and then calling the function to draw it in several
places. Then we created a function that draws multiple sized circles in various places (touching each other) and then called that
function to create the illusion of clouds different positions. Next, let's try adding items that have multiple sizes and colors.
Mountains in the background would work perfectly.
Click on Figure 2 to see the functioning program and code that you should have right now. Remember
all of us will have similar but not exactly the same code. The important thing is are we writing functions and calling them?
Quick Check - Answer the question, then click the question text to see the correct answer.
You create a function using the Python keyword _____.
def - defines a function.
True or False? A function requires a name.
True
In order to use a function, you must _______ it by its _______.
call, name
Mountains - position and color
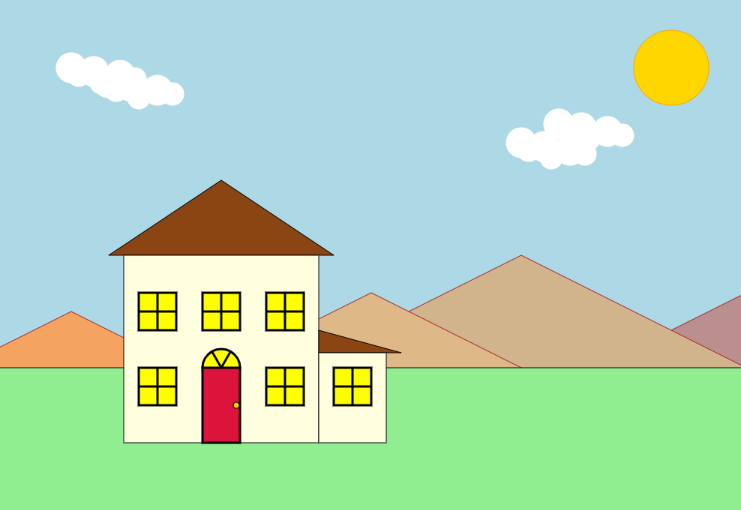 House with mountains - Figure 3
To make mountains in the background, we will need to consider a few things. Just like in real life, mountains will need to
be behind the house, yard and trees, but in front of the clouds and sun. So let's remember to place them there when we
call the function in our code. Since our mountains are behind the yard, we can simply make a 3-sided polygon or triangle of
one size and move the apex coordinates up or down to create the illusion of different sizes. This triangle function will
have three parameters: x, y, and color. We will attempt to achieve something like
House with mountains - Figure 3.
Let's start by going back to our graph and physically drawing one triangle. When drawing, just use x and y for the apex
coordinates of
the triangle. You can even draw it anywhere on your graph, because it is later, when you call this function, that
you will be giving coordinates
for x and y. That being said, you can lightly draw the mountains on your graph, marking only the apex.
This will help you visualize the output. Since you are using size, make the mountain you draw, the largest one
you want to use.
Once you have an x and y point, draw the triangle. Measure over and down for each of the other two sets of
coordinates. Following the same steps we used in our previous functions, whatever you over becomes x plus that
distance. Whatever you go down becomes y plus that distance. For your last point on the triangle, you will be
going to the left of your apex point, so it will be x minus that distance and y will be the same as the second
set of coordinates since y is the same distance down.
In my graph drawing, Graph Triangle - Figure 4, I have left out any reference to the rest of the drawing and made a triangle
which only references points in relationship to x and y. As the output screen shows in
House with mountains - Figure 3, we can achieve the appearance of different sizes and space by moving
the apex coordinates up or down and left or right.
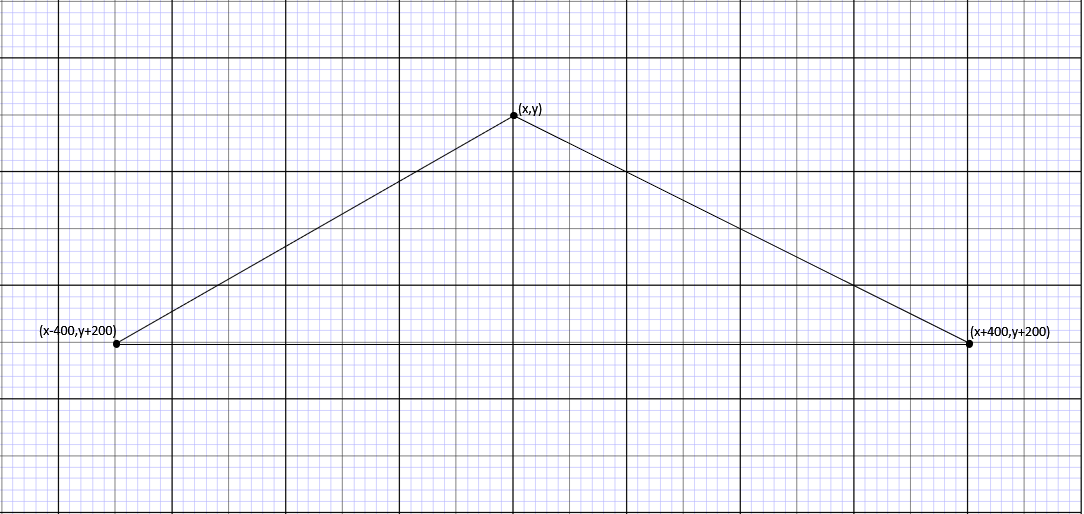 Graph Triangle - Figure 4
You should be able to write this function and call it, based on what you have learned from the draw_window() and
draw_cloud functions. So it will be an "On Your Own" assignment.
Here are the steps in pseudo code.
1. Define a function to draw a single 3-sided polygon.
2. Give it three parameters; x, y and color.
3. This function's body should use the canvas.draw_polygon() function.
4. In the canvas.draw_polygon() function, use your graph for x, y and your formulas for the
other two coordinates.
5. For the fill color use the variable color.
6. Call your function using various coordinates
and colors of your choice.
Remember:
- Use comments
- Placement order of objects
- Proper indentation of code
- Use named colors or hex
- Save your work
Quick Check - Answer the question, then click the question text to see the correct answer.
You can leave notes to yourself and others by using _________, which begin with a __.
comments, #
True or False? A function can be used only once.
False.
You can change certain aspects in a function by sending arguments to its _____________.
parameters
Add a Tree - if elif else
Let's add a single tree. Why just one? Because in our next lesson we will learn to use some
Python keywords called if, elif, and else, to write a conditional
statement that populates our
scene with trees of different sizes. These keywords are used in statements that allow us to execute code
based on meeting certain conditions. That's why they are called conditional statements.
The code that is to be executed upon meeting the condition is always indented. A conditional statement has a structure something like this:
if (condition1):
    run this code
elif (condition2):
    run this code
else:
    run this code
To prepare for this, watch this 6 minute video from
https://www.socratica.com/ on using these Python
keywords in our code. After watching the video, open a blank CodeSkulptor page and see if you
can write your own if, elif, else statement. We
will take a more in depth look in the next lesson.
Quick Check - Answer the question, then click the question text to see the correct answer.
An example of a Python keyword used in a conditional statements is ______.
if, elif, or else
True or False? The code to be executed in an if statement, does not have to be indented?
False. It must be indented.
Code that uses if, elif and else keywords are called ____________ statements.
conditional
On Your Own
1. See the instructions above and create a function
to add mountains to your project.
2.
Using a piece of graph paper and using the method you used to create a single mountain, make a tree,
using a triangle and a rectangle. We want to keep it small so we can use it as a starting point for larger trees.
Make the triangle 100 pixels high and the rectangle about 30 pixels high.
Use what you have learned about relationships to make all the points on your tree through a relationship to
x and y. Keep away from using any hard coded or actual coordinates on your graph.
Once you have your graph tree with its relationship formulas, write a function that will draw that tree and call
this function in the proper place in your program.
Try to make something like this:
Example Tree - Figure 5
3. Practice writing your own if, elif, else
statements in CodeSkulptor, using the information from the video.
This article is a lesson from the high school course Introduction to Computer Science with Python 3.
Thanks for viewing. Please check out my other articles on education and technology. I welcome any comments!
Comments »